Badge Hacking - WWHF Deadwood 2025
Hey there, as you can see im posting article on a regular basis :) Expect snow today !
I've had a lot of fun recently at Wild West Hackin'Fest in Deadwood, two talks on the line for me and wow, the ambiance and the wholesome community here made it like for me, its one of the best hacking event after NorthSec Montréal ! If you have the chance of going to WWHF Deadwood one day, please do !
Well except 3 flights in the same day and 1h drive after :D
WHY IS IT SO FAR AWAY ??
Anyway, today im gonna do a small write up about the CTF Electronic Badge !
Badge Specs
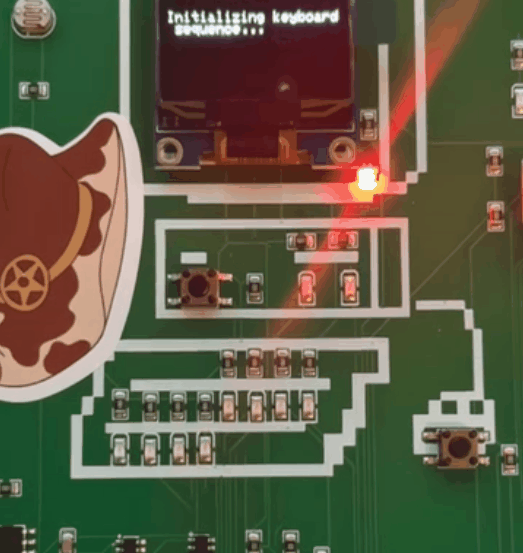
It's a 40$US electronic badge, including an ESP32-S3 Wroom 1
ESP32-S3-WROOM-1 is a 2.4 GHz Wi‑Fi + Bluetooth LE module based on the ESP32‑S3 SoC, featuring dual-core Xtensa LX7 up to 240 MHz, integrated flash (up to 16 MB) and optional PSRAM (up to 8–16 MB depending on variant), with on‑module PCB antenna (WROOM-1) or u.FL (WROOM‑1U).
For the screen it looks like a 2.44 cm (0.96 Inch) I2C/IIC 128×64 OLED Display Module 4 Pin, White Color. Thou im not sure i would have to unsolder it :)
There is also a TP4056 Chip, its a single‑cell Li‑ion/Li‑poly linear charger IC used to charge a 3.7 V nominal (4.2 V full) battery from a 5 V source like USB.
Warning - The TP4056 chip might be very hot if you use the badge while plugged as USB / Serial ( I burned my thumb twice D: )
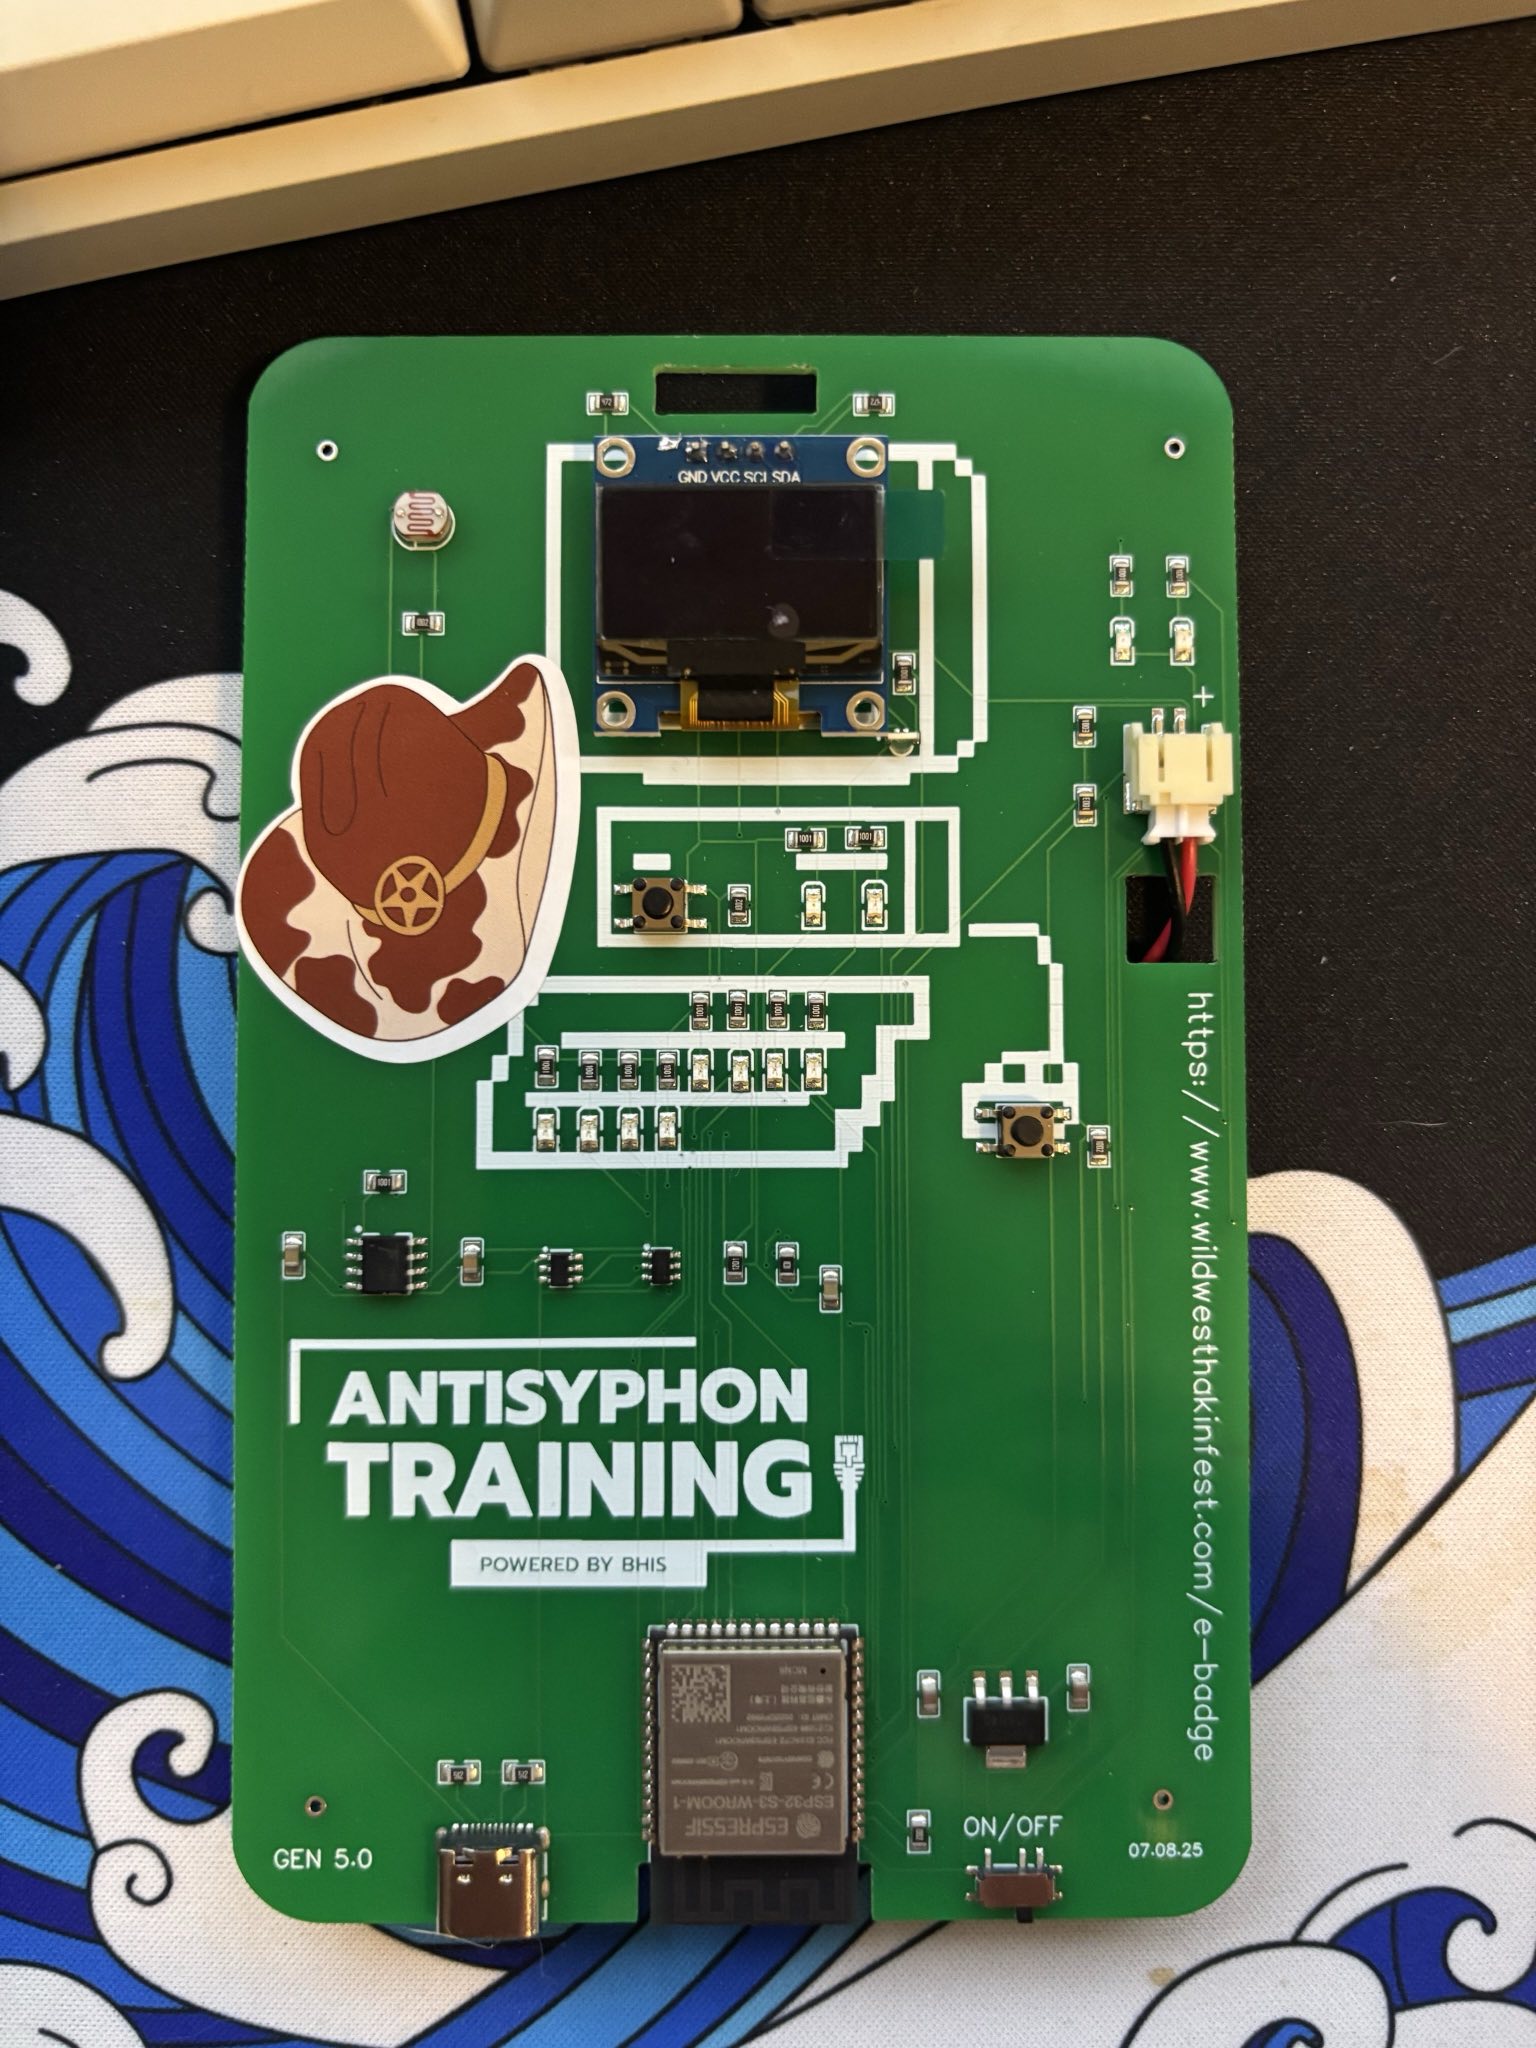
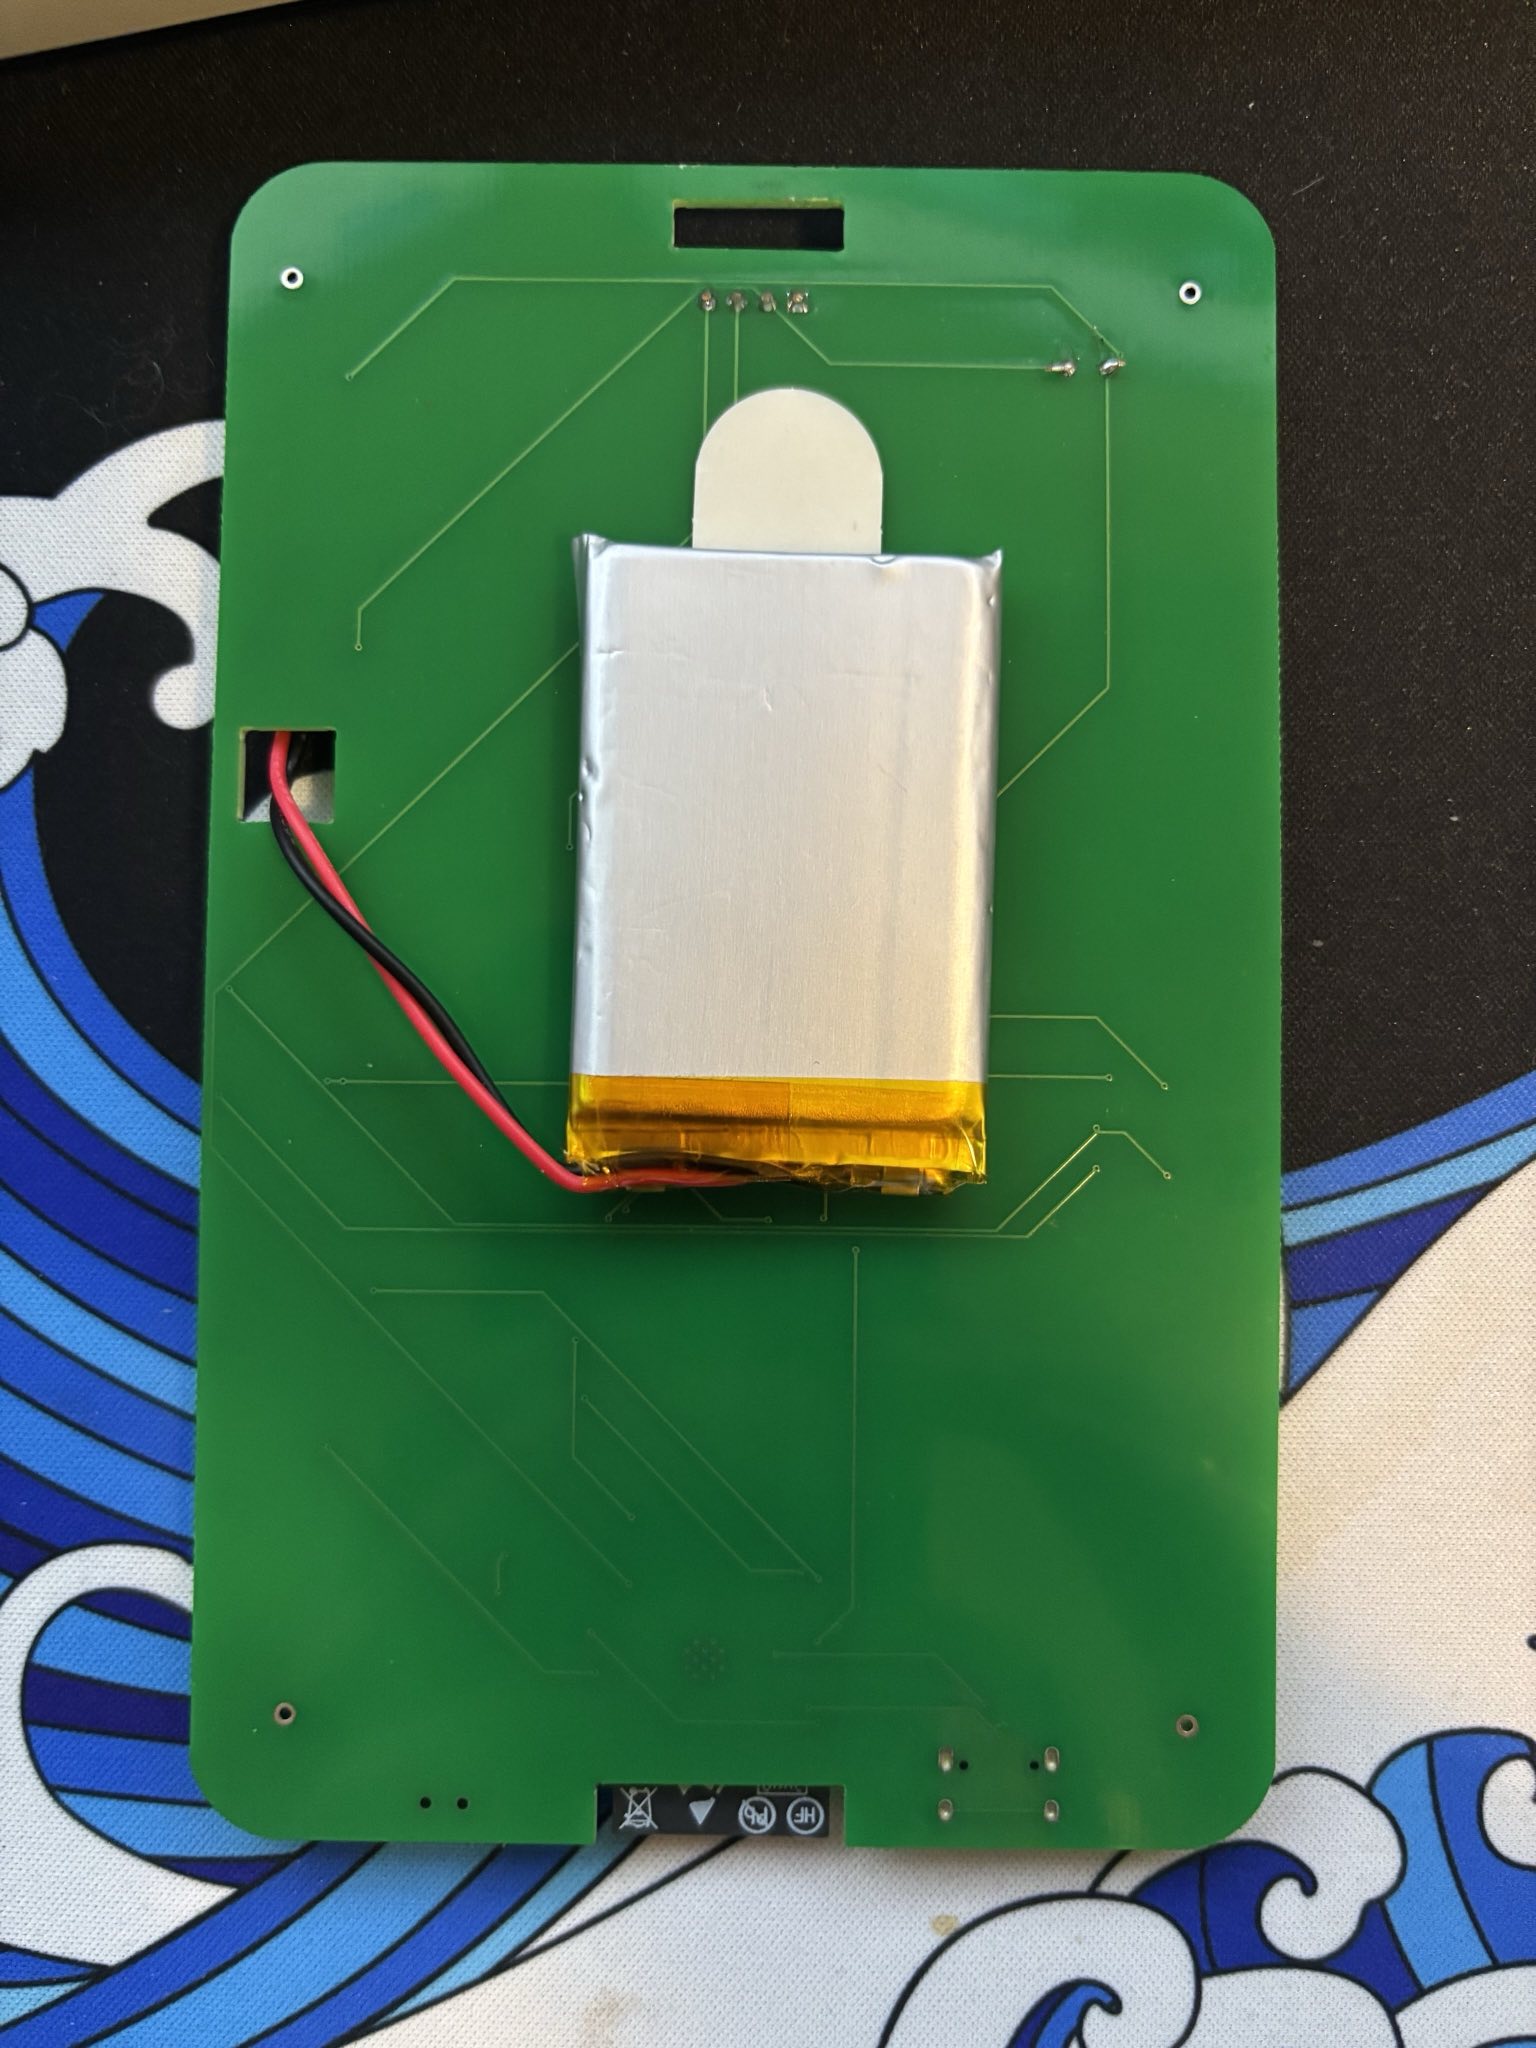
There is also a battery, but I don’t know much about its capacity.
Challenges
Important note, the MetaCTF, during the conference was not focus on the Badge Itself, 0 points after the completion of the Badge Related Challenges :(
The Challenges were mainly focused on the differents strings during the boot process of the badge, you could just extract the ESP Firmware and then with Ghidra read the strings content.
In the other hand. they had a few not CTF related challenges in this badge and that's what im gonna go through in this article.
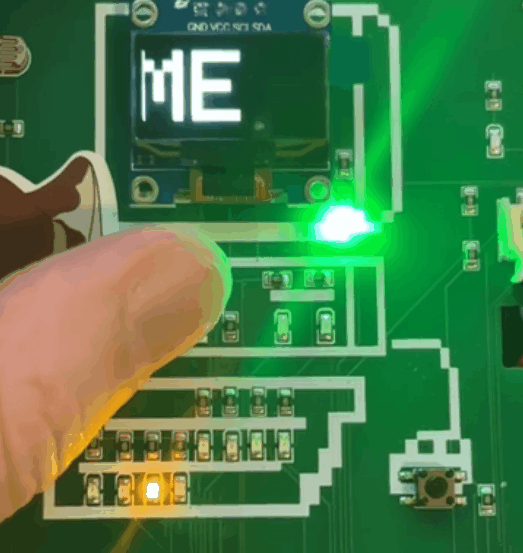
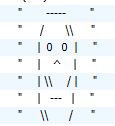
Binary & LEDs
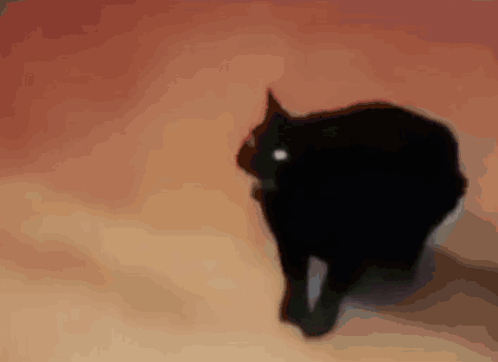
Im starting with this challenge because i think thats one of the first one you can see while playing with the badge. This binary sequence is starting once you press the button below the screen. (The lights are gonna show a binary sequence and once done the morse code will start, in the gif below i cut the morse part.)
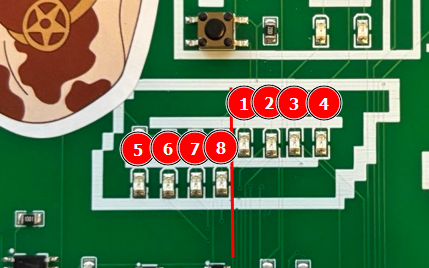
As you can see, we have 4 LEDs on top and 4 below. If we translate this, it’s an octet, but the tricky part is figuring out which side is the first bit.
Let me explain. Try to decode this sequence yourself if you want before reading the solution. I’ll wait… Done?
So, if we want to translate it, do we take the 4 bits on the top as the starting bits, or the ones below? Let’s do both and see what happens :D
Bit sequence with Bottom First
10001111 10110111 10010110 10001100 10110111 10010110 10010001
10111000
Result : ··¸

Bit sequence with Top First
01110000 01001000 01101001 01110011 01001000 01101001 01101110
01000111
Result: pHisHinG

Here is the right bit order if you are curious and want to reproduce the result yourself.
Since the Morse code follows right after, let’s jump into that next!
Morse Code
Here is the morse code, like I said, its right after the binary sequence, so make sure to record it and start decode it by yourself :D
I struggled a bit with that one because im not used to decode morse code from a bright red light, took me a while but i found a technique.
Just simply play the video in 0.25x or something so you can clearly see the big and small blinks. Took me a lot of try and fails, I didnt use any script or AI tool here, just my keyboard and a slow motion video, much faster that way :)
Morse Code Sequence
-.- .-. .- -.-. -.- . -..
Result: KRACKED
Good Old Serial Access
Ah, the good old serial shell access. Maybe I lied and this is actually the first thing I tried before touching the buttons :D
Since we have a USB-C connector and since its a ESP32, there is a way to gain a shell into this badge or at least extract or upload the firmware of the chip.
In this case, I just wanted to connect and see what happens.
The badge is using a baudrate of 115200
I used the tio command like so, you can use the tool you want (screen, putty, etc.)
tio -b 115200 /dev/cu.usbmodem1101
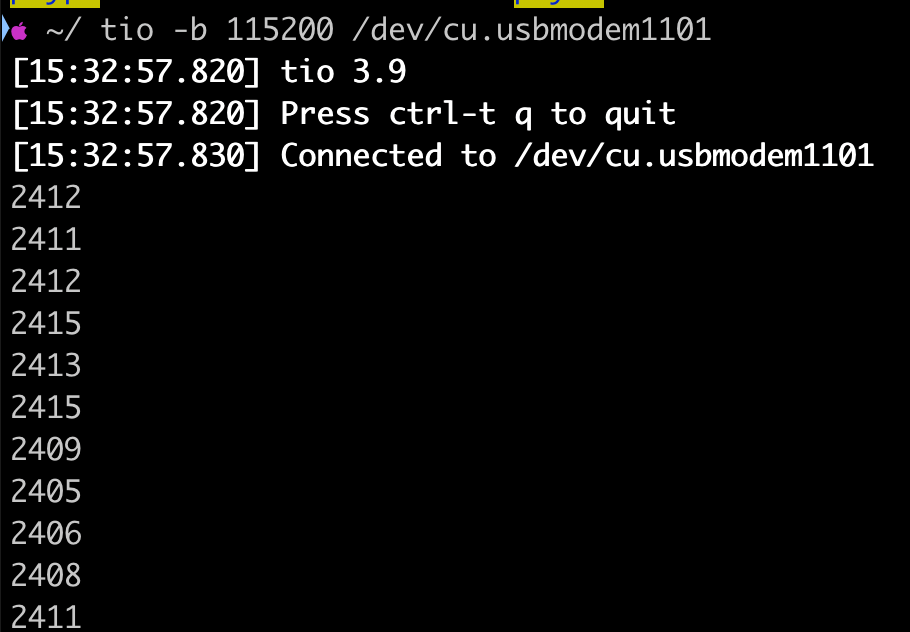
As we can see there is a lot of transmit data to the terminal, like infinite numbers and it can really overwhelm your CLI.
I still didnt have figured out what are these numbers, if you have an hint or something I would be happy to edit this blog post :D
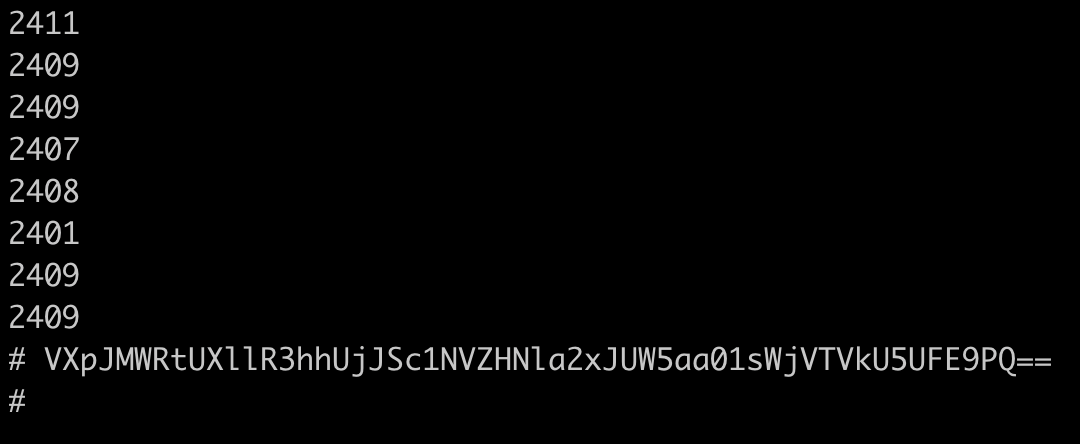
Now it's interesting, if we press the button under the screen, an encoded string character is sent to the terminal, let's try to decode it !
Base64, right ?
Looks like base64, so let's decode it as base64
VXpJMWRtUXllR3hhUjJSc1NVZHNla2xJUW5aa01sWjVTVkU5UFE9PQ==
Result: UzI1dmQyeGxaR2RsSUdseklIQnZkMlZ5SVE9PQ==

Base64 again
UzI1dmQyeGxaR2RsSUdseklIQnZkMlZ5SVE9PQ==
Result: S25vd2xlZGdlIGlzIHBvd2VyIQ==

Base64 again and again
S25vd2xlZGdlIGlzIHBvd2VyIQ==
Result: Knowledge is power!
Well, scientia potentia est !
BLE Messages in the air
You Are still there ? Good, let's jump into the Bluetooth challenge then !
I actually found this one by luck, I had a feeling there was something related to bluetooth, so I opened my phone and checked the nearby device, and then I saw this.


So, we can connect to the badge, let's see what we can do with that information.

Ah, im using nRF Connect application on iOS.
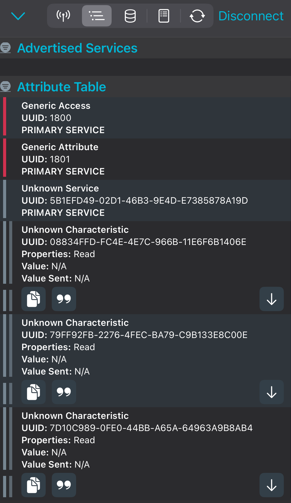
Once connected we can see some messages in the Attribute Table, 3 of them with the Unknown Characteristic
If we click on the Down Arrows we can' t understand anything, you need to click on the big double quote buttons and selecte UTF-8 to see the readable characters.
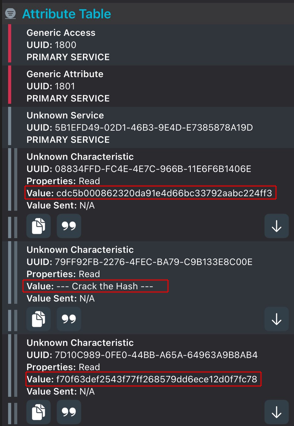
cdc5b000862320da91e4d66bc33792aabc224ff3
--- Crack the Hash ---
f70f63def2543f77ff268579dd6ece12d0f7fc78
I guess let's crack the hashes ?
We are facing unbreackable SHA1 here
cdc5b000862320da91e4d66bc33792aabc224ff3:darkimage
f70f63def2543f77ff268579dd6ece12d0f7fc78:accessit
Extract that Firmware
Okay so this part is kind of related to the next challenge.
When we press the right button, there are a few encoded and encrypted messages that are display on the screen for a few seconds. I didn't want to press that button all the time so i had the idea of just extracting that ESP32 firmware and read it using Ghidra.
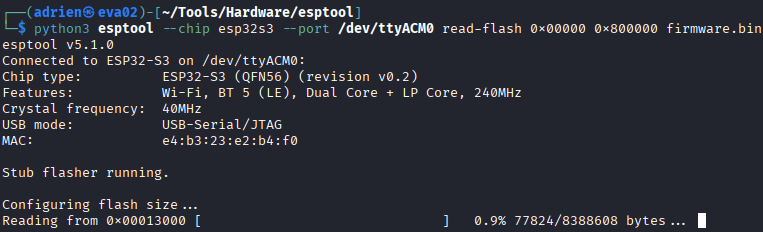
Since it's a ESP32 microcontroller, we can use the following tool.
https://github.com/espressif/esptool
We also know the memory size since its display everytime we boot the badge, so the command would be something like this
python3 esptool --chip esp32s3 --port /dev/ttyACM0 read-flash 0x00000 0x800000 firmware.bin
Make sure to use the right chip version or else it wont work.
Extract Partition Table
If you want to extract the partition table of the firmware you can use the following command
dd if=firmware.bin of=partition-table.bin bs=1 skip=$((0x8000))
count=$((0x1000))
if=firmware.bin input file
of=partition-table.bin output file for partition table
bs=1 byte-sized block for precise offset
skip=0x8000 skip first 32KB
count=0x1000 extract 4KB
Once its done you can use hexdump on the binary output to check the name, offset, size and description of the partitions.
hexdump -C partition-table.bin | head -40
Here is the output in a nice table, just for you ;)
| Partition Name | Start Offset (Hex) | Start Offset (Decimal) | Size (Hex) | Size (Decimal) | Description |
|---|---|---|---|---|---|
| nvs | 0x0090 | 144 | unknown | unknown | Non-volatile storage partition (NVS) |
| otadata | 0x0200 | 512 | unknown | unknown | OTA metadata (over-the-air update info) |
| app0 | 0x1000 | 4096 | 0x3300 | 13056 | Application partition 0 |
| app1 | 0x3400 | 13312 | 0x3300 | 13056 | Application partition 1 |
| spiffs | 0x6700 | 26368 | 0x1800 | 6144 | SPI Flash file system |
| coredump | 0x7f00 | 32512 | 0x0100 | 256 | Core dump storage |
Now if you wanna extract each parition into a single binary file you can use the following command, here is an example to extract spiffs.bin
dd if=firmware.bin of=spiffs.bin bs=1 skip=$((0x6700)) count=$((0x1800))
Ghidra Analysis
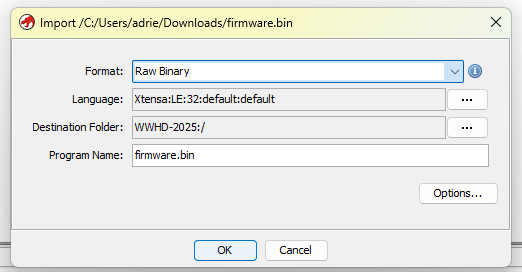
At first i wanted to analyse each binary one by one but then I just put the whole firmware into Ghidra :D

Once you import the firmware.bin, make sure to select Xtensa architecture (little) or Ghidra wont be able to analyze it.
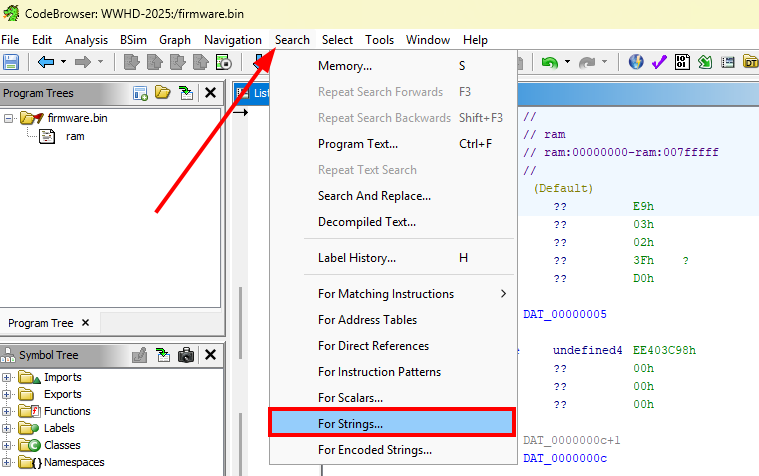
Once the binary file is analyzed, we can start looking at the strings.
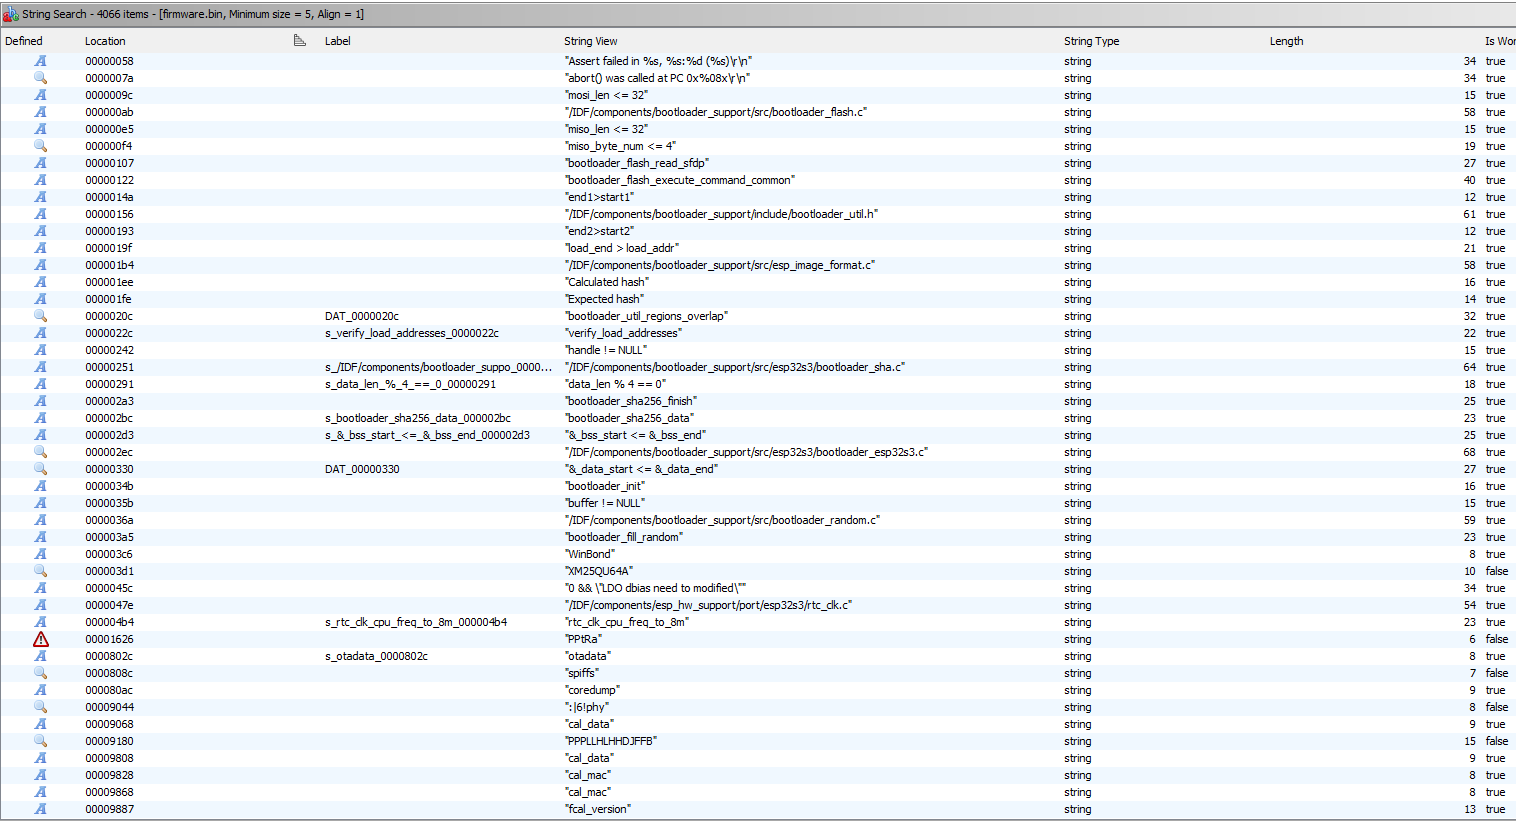
Now that we can see all the strings, the bootloader information and different random funny strings are available. Some of these information are answers for the MetaCTF.
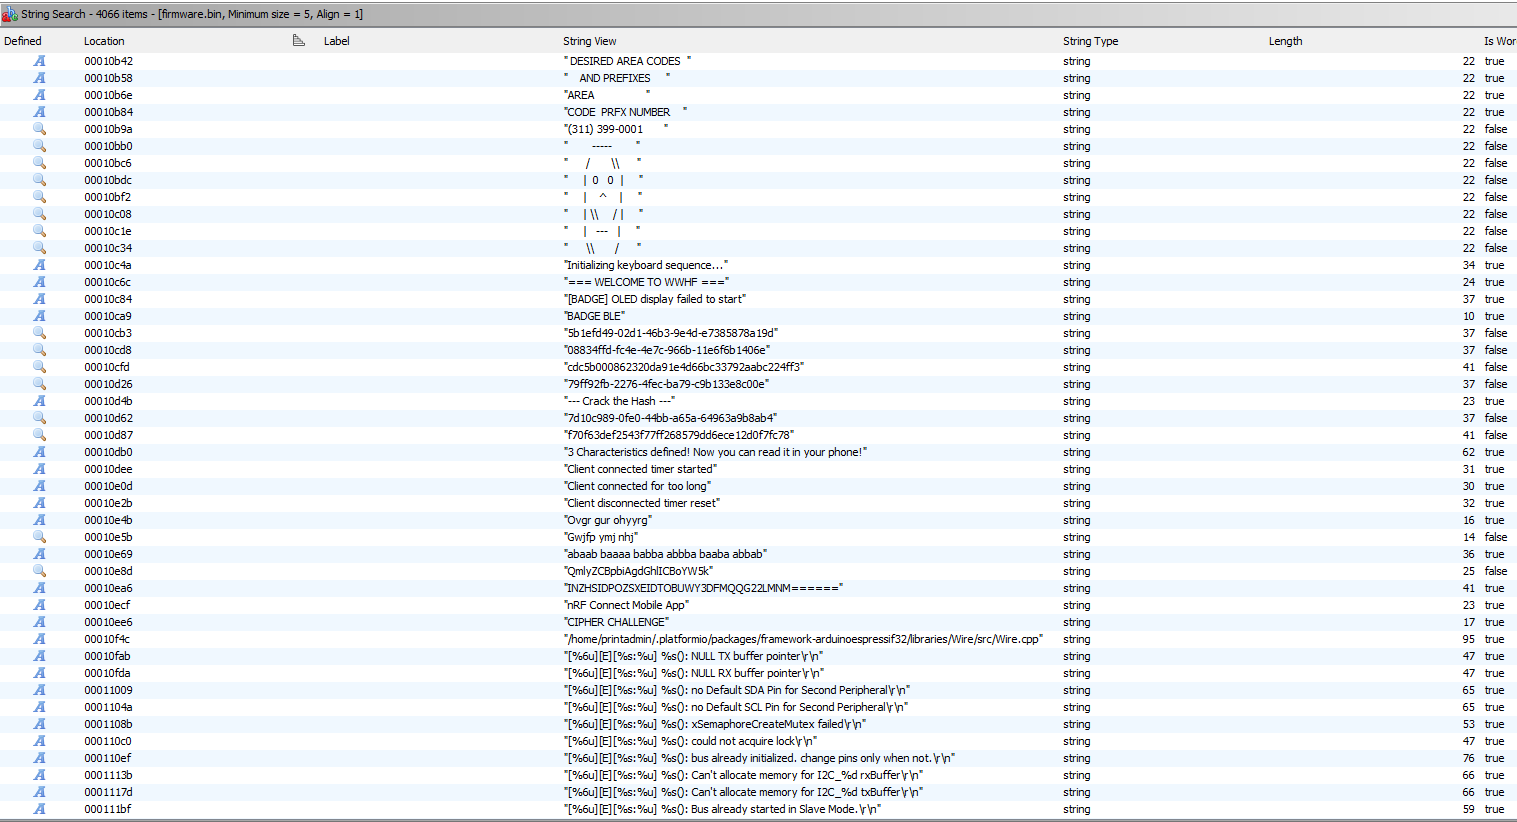
After scrolling a bit, we can then now see the different crypto challenges, so we don't have to press that button all the time :)
Oh no Crypto
Well last challenge, here is the diferent "encrypted" strings with the results, enjoy :)
| String View | Crypto | Result |
| Ovgr gur ohyyrg | ROT13 | Bite the bubbly |
| Gwjfp ymj nhj | ROT5 | Break the ice |
| abaab baaaa babba abbba baaba abbab | BaconCypher | KRYPTO |
| QmlyZCBpbiAgdGhlICBoYW5k | Base64 | Bird in the hand |
| INZHSIDPOZSXEIDTOBUWY3DFMQQG22LMNM====== | Base32 | Cry over spilled milk |
Well I don't have anything else to say here, thanks for reading this article :)